Editorial Workflow in Acorn with Helmut4/CatDV/LucidLink
All of the automated functionality described in this document depends on:
The Helmut4 client being open and running on your workstation
You are logged into Helmut4 through the Helmut4 Web UI
The Helmut4 Adobe Panel being open during your edit
In addition, if using CatDV for importing assets to Adobe:
The CatDV Adobe Panel installed and being logged in
Overview
As a high-level overview to what this document describes, here are the basic steps to the editorial process using Helmut4 with a MAM like CatDV and cloud file storage such as LucidLink.
Open Helmut4 client on your workstation
Login into the Helmut4 WebUI
Open your project using the HelmutFX module’s projects tab
Import media:
Import new media directly from storage
Import media from Acorn using the CatDV Adobe panel
Import media from other projects using the Cosmo tab in the Helmut4 Adobe Panel
Import or upload media into other projects using the Cosmo tab in the Helmut4 WebUI
Create or link existing edit proxies if needed
Use the CatDV WebUI for bulk generation or media that isn’t in your project
Use the Helmut4 Adobe panel media in your project
Export your sequence using Helmut4’s Adobe Panel
Optionally send to review/approval solution or invoke other automations
Save and close your project to perform the following automations
Automatically unlock and “check-in” the project
Sync the contents of the project folder with the corresponding Catalog in the MAM (CatDV) so that all media in your project folder is searchable
Continue reading to learn more about the editorial process with these solutions.
The Helmut4 Adobe Panel Extension
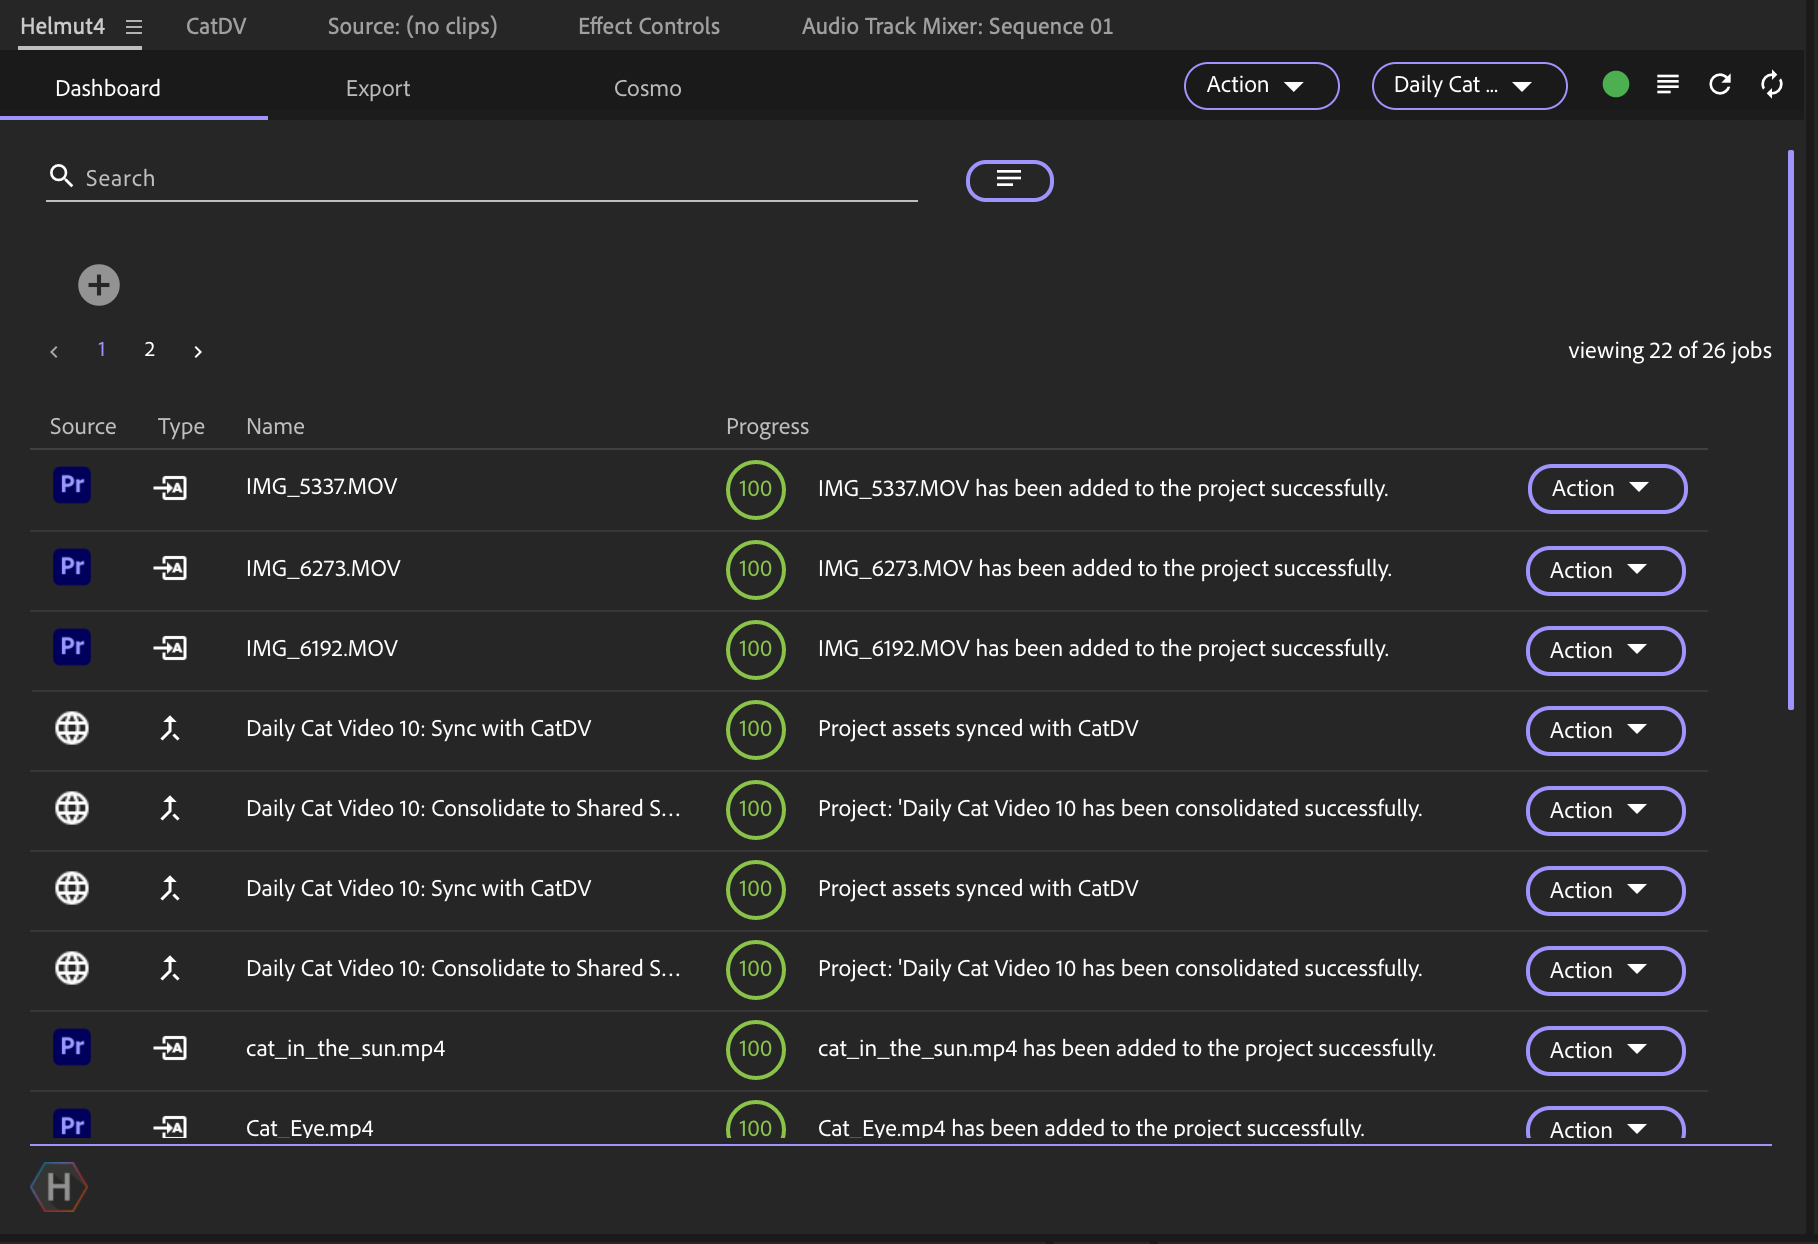
The Helmut4 Adobe Panel Extension works in the following applications:
Premiere
After Effects
Audition
The panel requires that you have the Helmut4 client running on your workstation, and that you’ve already logged into Helmut4 via the Helmut4 Web UI. The panel will use your login session from the web browser.
The panel communicates with the Helmut4 client, which must also be running on your workstation. The Helmut4 client facilitates all communication with the Helmut Server. The client in turn sends requests through the Adobe panel to Adobe CC applications such as Premiere, After Effects, Audition, and Media Encoder (AME has its own “hidden” panel that does not have a user interface. You don’t ever need to interact with the hidden AME panel, but it’s helpful to know of its existence).
The Helmut4 client, Helmut4 Adobe Panel Extension, and the aforementioned hidden AME panel, are all installed together with the Helmut4 Client Installer.
Contact your administrator if you need to have the Helmut4 client and Adobe Panel Extensions installed on your workstation.
These workstation-specific software products should be version-synced with the Helmut Server, as new functionality and bug fixes introduced in Helmut4 usually apply to both the server and client applications.
To access the Helmut4 Adobe Panel Extension, in the Adobe application, go to the menu bar and access:
Window > Extensions > Helmut4
CHESA recommends docking the Helmut4 Adobe Panel in your Premiere Adobe Workspace to assure the panel is always open when you open a Project.
You can then save your Premiere Workspace preference to the Helmut Server. This not only saves your Workspace preference, but also enables you to work from any Workstation in your environment. When you log into Helmut4, it will load your profile from the Helmut Server, no matter which edit workstation you are working from. This preference is individual to all users. To do this:
Dock the Helmut4 Adobe Panel Extension to the panel in Premiere where you prefer
Go to the Helmut4 Web UI
Click on your username in the upper left corner under the Helmut4 module logo
Select
Copy local PR profile to server
Your Workspace profile will now load from the Helmut Server whenever you log into, or refresh, the Helmut4 Web UI.
Opening a Project
The editorial process starts with opening a Project in Helmut4’s Web UI.
Make sure the Helmut4 client is running on your workstation. You will see the Helmut4 icon in your menubar on macOS and in the task tray in Windows.
Log into Helmut4’s WebUI.
In the HelmutFX module’s Projects tab, search for the Project you’d like to open, using the search bar and filters. Documentation for the Projects tab of HelmutFX is available here.
Click the Project name. This will engage with your workstation’s Helmut4 client to open the Adobe application associated with the Project.
When you open a project through the Helmut4 Web UI, you are essentially “checking out” your project.
While you have the project open, only you and administrative users of Helmut4 can open the project. Other users will not be able to open locked projects.
The project will remain locked in Helmut4 while you have it open, and it will remain locked until you close the Project in the Adobe app itself, effectively “checking in” the Project.
Do not open your project by using the File > Open menu in the Adobe application, and do not double-click the project file in the Finder or Windows Explorer. Open the project through the HelmutFX module in Helmut4’s web UI.
Importing Media
The HelmutIO module handles import and export functions of Helmut4. Importing media into your Project can be done in any of the following ways.
Importing New Media Into Your Project
Helmut4 facilitates keeping all your project media on centralized shared storage. This document focuses on using a LucidLink filespace as centralized shared storage.
You can use the Import command from the File menu in the Adobe application, or simply drag media files from local storage into your project (this is called “auto-importing”).
As you import new media into your project, the Helmut4 Adobe Panel will examine the imported media and determine what storage the media lives on.
If the media is already located on LucidLink, the Adobe Panel will leave the media in place.
If the media lives on local storage or on a connected SAN or NAS, then the Adobe Panel will instruct your Helmut4 client to copy the media into your project folder on LucidLink, and automatically re-link it to the copy on LucidLink.
Importing Managed Media Into Your Project
The term “managed media” refers to media that has already been ingested into the MAM. We’ll be referring to CatDV as the MAM in this document. You can import any media from CatDV into your project, as long as it is online.
CatDV also has an Adobe Panel Extension. If you are importing media from your CatDV library into your project, you can use the CatDV Adobe Panel Extension to import media managed by CatDV.
Open the CatDV Adobe Panel Extension from the menu bar: Window > Extensions > CatDV
Log into CatDV
Search for media you’d like to import into your project using any metadata search terms, and/or browse through Catalogs in CatDV for media you’d like to import
Use the Import button in the CatDV Panel to import media into your Project.
Importing Media from Other Projects
Cosmo Panel Import
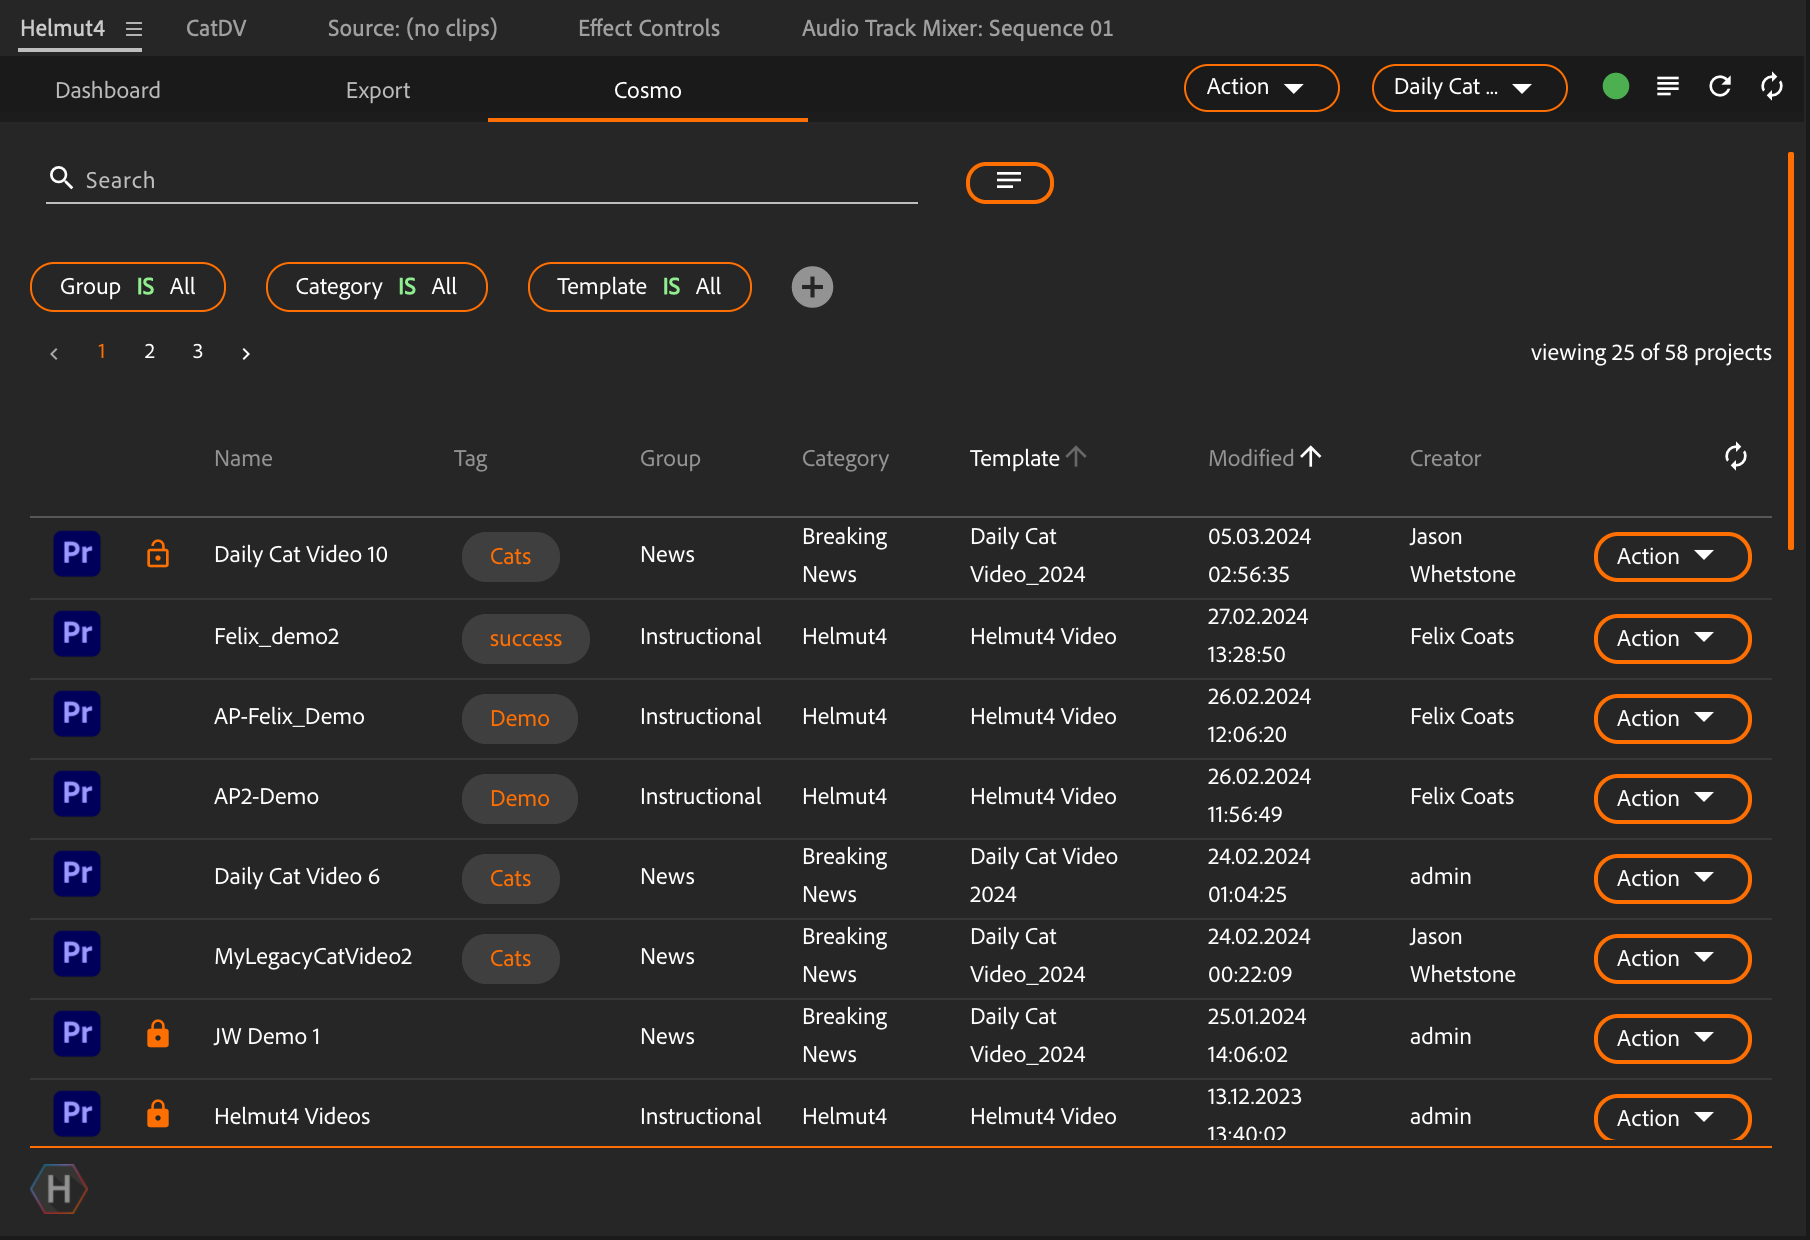
Cosmo, or HelmutCO, is a module in Helmut4 that indexes all projects cataloged by Helmut4, and tracks the file paths of all of the media in that project, as well as the Bin and Sequence structure of Projects.
The Cosmo module in Helmut4’s Adobe Panel Extension presents you with a list of all Adobe Projects indexed in Helmut4. Selecting a Project in the Cosmo tab will allow you to navigate through all the Bins and Sequences in that Project, as well as the media files in the Project.
You can use the Cosmo tab in the Helmut4 Adobe Panel to:
Import individual media files from an indexed Project into your currently-open Project
Import entire Bins from an indexed Project into your currently-open Project
Import entire Sequences from an indexed Project into your currently-open Project
To do this:
In the Helmut4 Adobe Panel, select the Cosmo tab
Search for a Project you’d like to import media from into your currently-open Project
Click the Project name to view and navigate the Project’s Bin and Sequence structure
Import individual files, or entire Bins or Sequences into your project by clicking Action > Import next to the item you’d like to import
Web Import/Upload
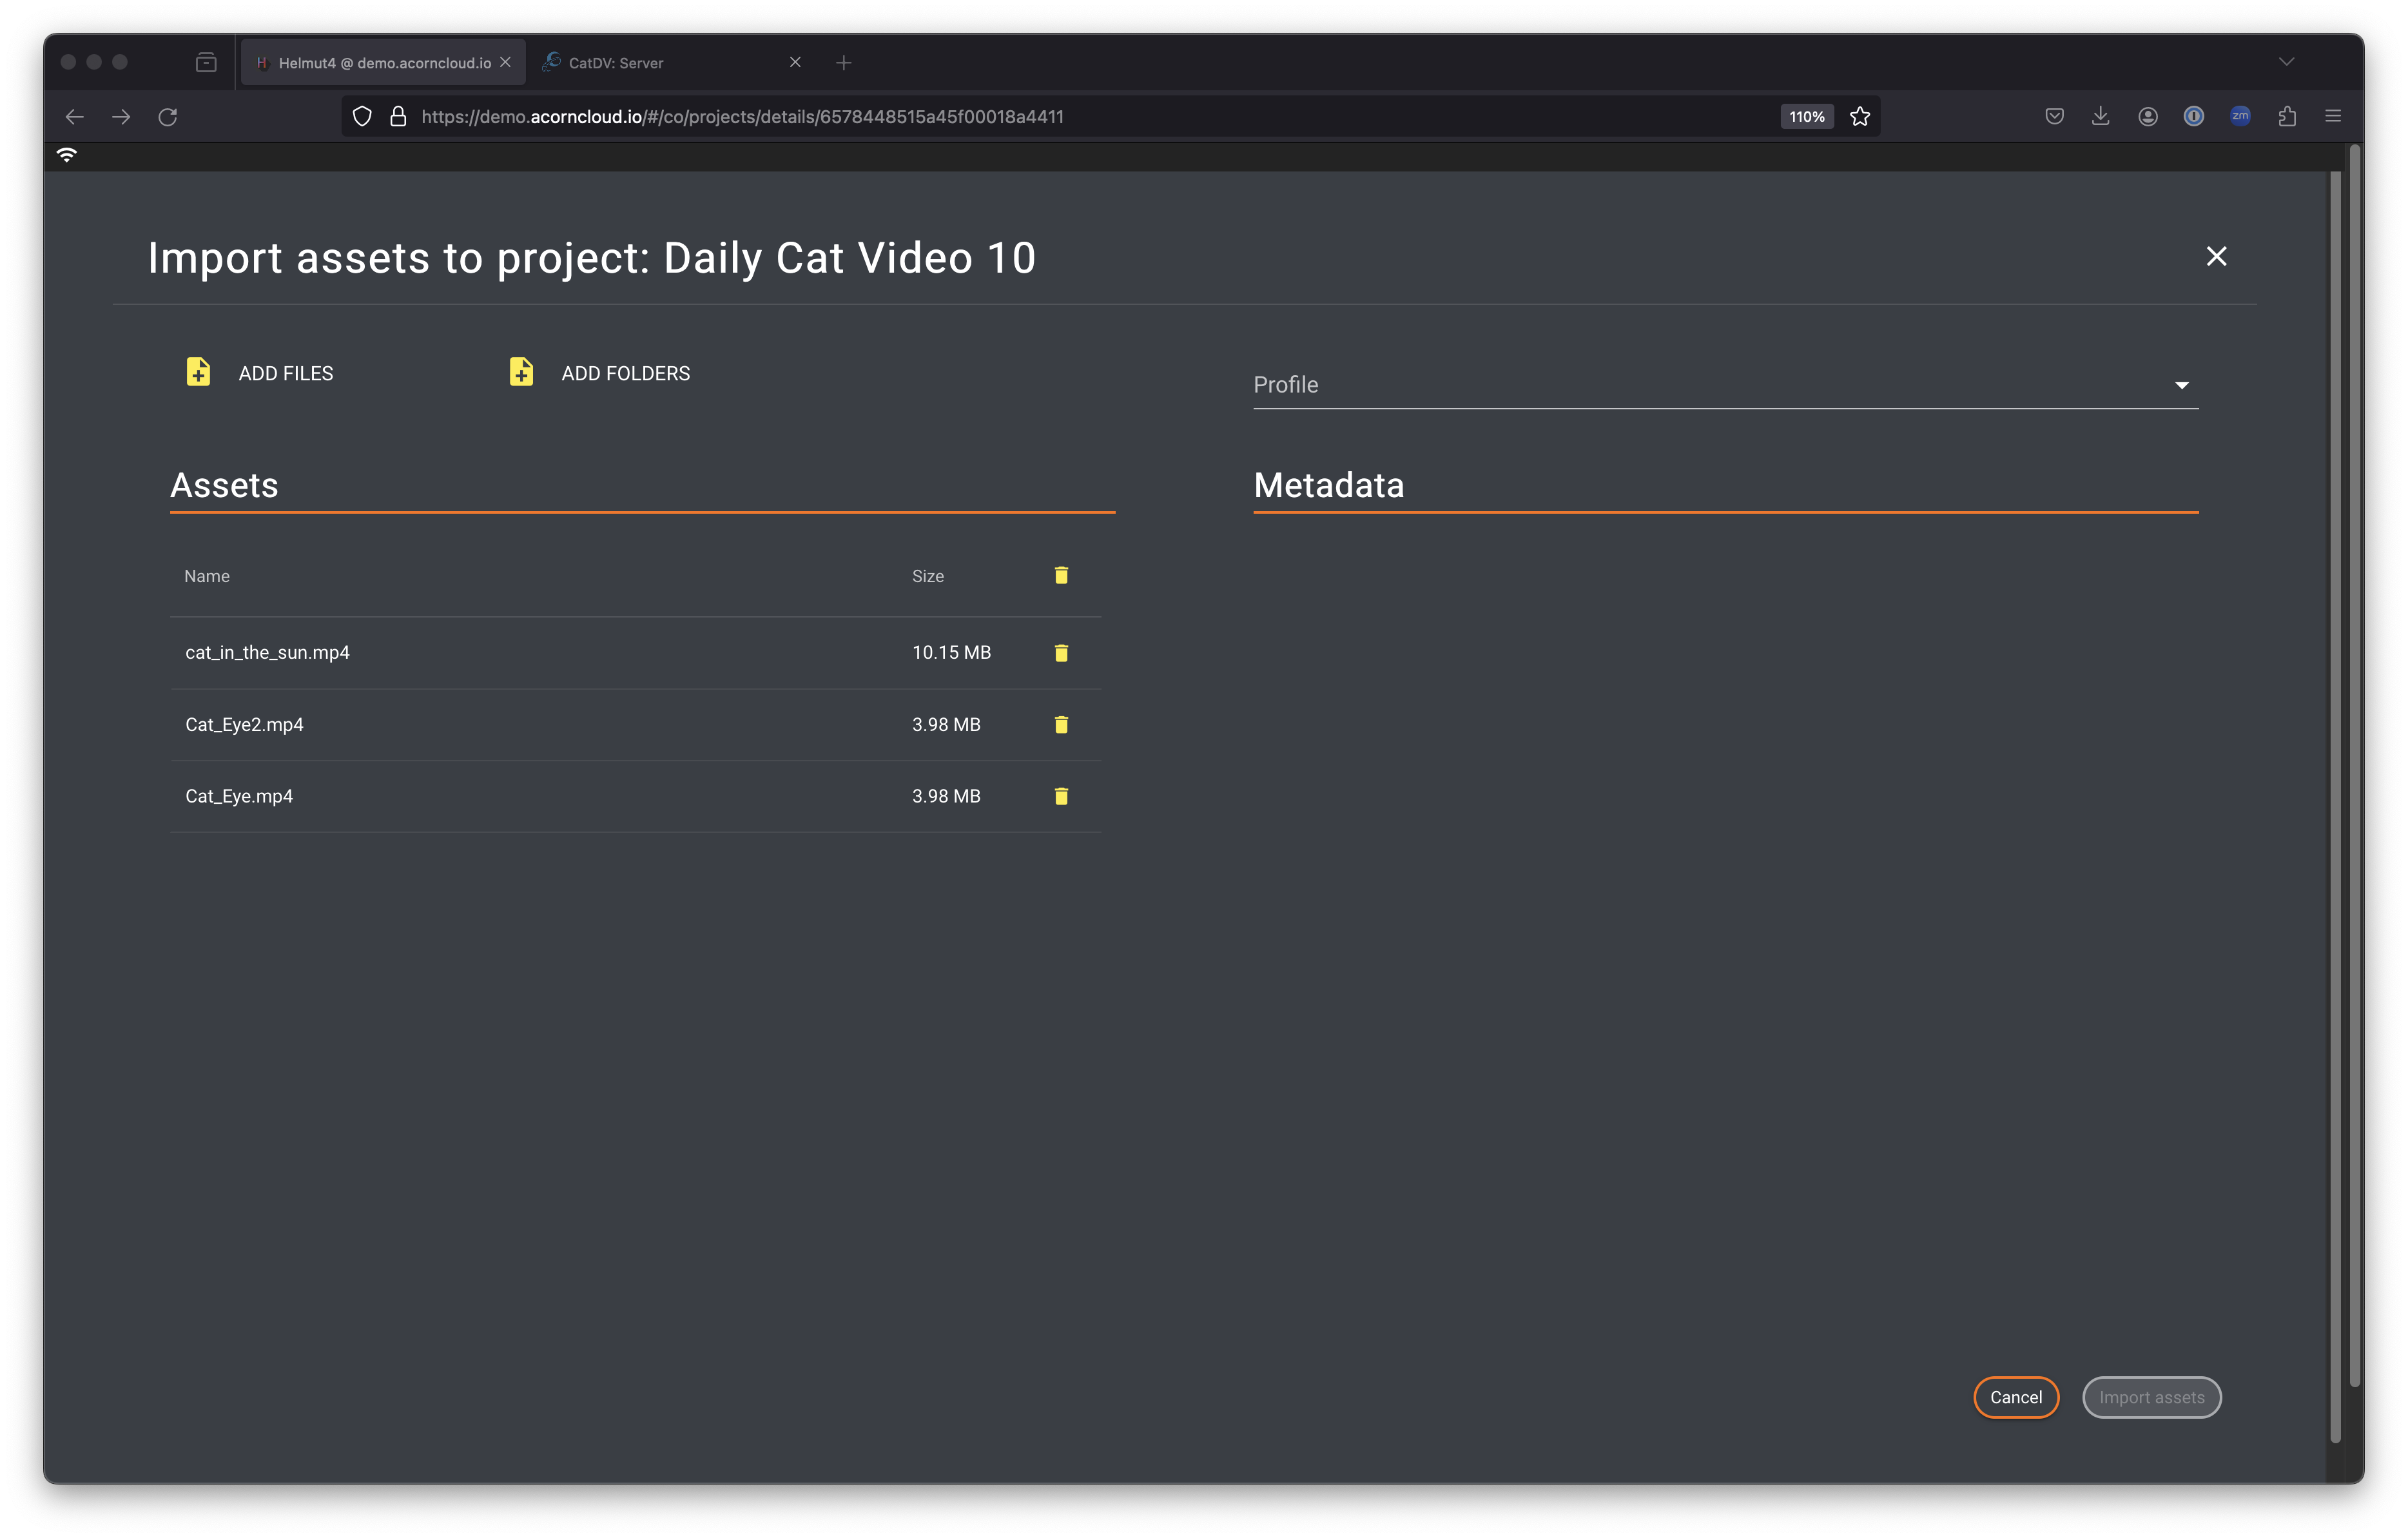
Cosmo also allows the ability for a Helmut4 Web UI user (such as a producer, DP, AE, or ingest technician) to import or upload new media directly into an Adobe Project (even one you currently have open) using the HelmutCO module in Helmut4’s Web UI. This enables anyone who can connect to Helmut4’s Web UI to add media to any project cataloged by Helmut4, whether you currently have it open or not.
To do this, the user uploading or importing the media can:
Log into the Helmut4 Web UI and select the orange HelmutCO (Cosmo) module
Search for and select a Project to see the Bins and Sequences in that Project
Navigate to the Bin where you’d like to add the new media
You can use the Create Folder button at the top of the Web UI to create a new Bin if you desire. If you have created a new folder, navigate to that folder by clicking it
There are two ways to import media, depending on where the media is located.
Import Assets
For the purposes of Acorn, use the Import Assets button to import media that is already located on the shared storage (LucidLink). For example, you’ve just come back from a shoot or just acquired some media and you would like to copy it manually to organize it into the project folder on LucidLink for an editor to use.
Select an Import Profile. Most customers will have only
Cosmo Web Importbut CHESA may set up other Import Profiles during your project implementation if required.You have the ability to import individual files, or folders of files to the Project. You will be selecting these in a web-based file browser and must navigate to the
/Volumes/acornmount point to select your files on LucidLink.Fill out any Metadata required for the Import Profile chosen.
Press the Import Assets button in the lower right.
Upload Assets
The Upload Assets button is used to upload media only when you are not able to access the shared storage (LucidLink). For example, you are working on a remote workstation that does not have the LucidLink client installed or cannot access LucidLink through a firewall. The media will be uploaded through the Helmut4 Web UI to the LucidLink storage and will land in the Imports directory within the project folder of the Project you chose.
Select an Upload Profile. Most customers will have only
Cosmo Web Upload Assetsbut CHESA may set up other Upload Profiles during your project implementation if required.You have the ability to upload individual files, or folders of files to the Project. You will be presented with a regular file chooser to select files from your local storage to upload.
Fill out any Metadata required for the Upload Profile chosen.
Press the Upload Assets button in the lower right.
Helmut4 will execute a Stream that is connected to the Profile you selected during the import/upload action. The Stream will:
Upload the assets to LucidLink and move them to the Project folder’s Imports directory (if upload was chosen)
Add the assets to the Project you’ve navigated to in Cosmo
Update and reindex the Project and sync it with the Adobe app if open, to allow an editor to use the media you uploaded.
Edit Proxies
Sometimes it may be necessary to create lower-resolution proxies of your media to edit with. There are a few reasons you may want to do this:
You are working remotely. Your high-res media is stored on a SAN or NAS at your headquarters. Your internet connection in the remote location is not fast enough to edit with high-res footage.
You don’t want to download high-res footage locally because it’s too large, would take a long time to download, and/or would incur cloud egress fees to download.
Your hi-res footage is all located on cloud file streaming storage like LucidLink, but your internet connection is not fast enough to edit with high-res media.
You are working with high resolution footage like 4K or higher, and would like to edit with lower-resolution proxy media.
Edit Proxies are different than web streaming proxies used for viewing content in a MAM.
Web streaming proxies
Used for viewing media in a MAM, usually in a web browser
For reference viewing only
Emphasis on a streaming through a web browser, not editing in NLE
Highly compressed, smaller frame size, low bitrate, usually MP4 or WEBM
Remain online for referencing content in a MAM in perpetuity
Edit Proxies
Used for a smoother editing experience when hi-res is very large in frame size, bitrate, or file size
Usually ProRes Proxy or similar
File size and bitrate smaller than hi-res, but frame size usually identical to hi-res
Emphasis on lower bitrate editing, not streaming
Can be deleted after editing
There are several ways to generate edit proxies.
Edit proxies should be considered temporary media. They can be regenerated from the high-res media at any time, as long as it is online.
Acorn is capable of generating edit proxies in a number of ways. It’s best to plan ahead, because generating the edit proxies may take time depending on how much media you are editing with and the duration of the media.
For example, let’s say you’re working on a project already. You have a fast connection to the storage and you’re editing normally with your high-res. Later you need to work on the project remotely at home, and you know your connection at home is not as fast as the connection at the office. Or, maybe your project is very large and you don’t want to download and cache all that hi-res media at home. It might take some time to generate your edit proxies, so start the process before you need to use the edit proxies.
Generating/Purging Edit Proxies Using CatDV
Edit proxies can be generated using CatDV, which keeps the hi-res media where it’s cataloged in the cloud or on your on-prem storage. Since the generation is happening where the hi-res media is stored, you don’t need to download the hi-res media locally to create edit proxies.
Individual
To generate edit proxies individually using CatDV:
Open the asset in single-asset view.
Go to the Workflows metadata tab and under the Proxy section select
GenerateorPurgeunder the Edit Proxy field.Press the Save button above the metadata tabs
You will see the progress wheel over the asset as the edit proxy generates.
Bulk
You can also generate edit proxies in bulk. You’ll select multiple assets in CatDV and change the Edit Proxy field to Generate.
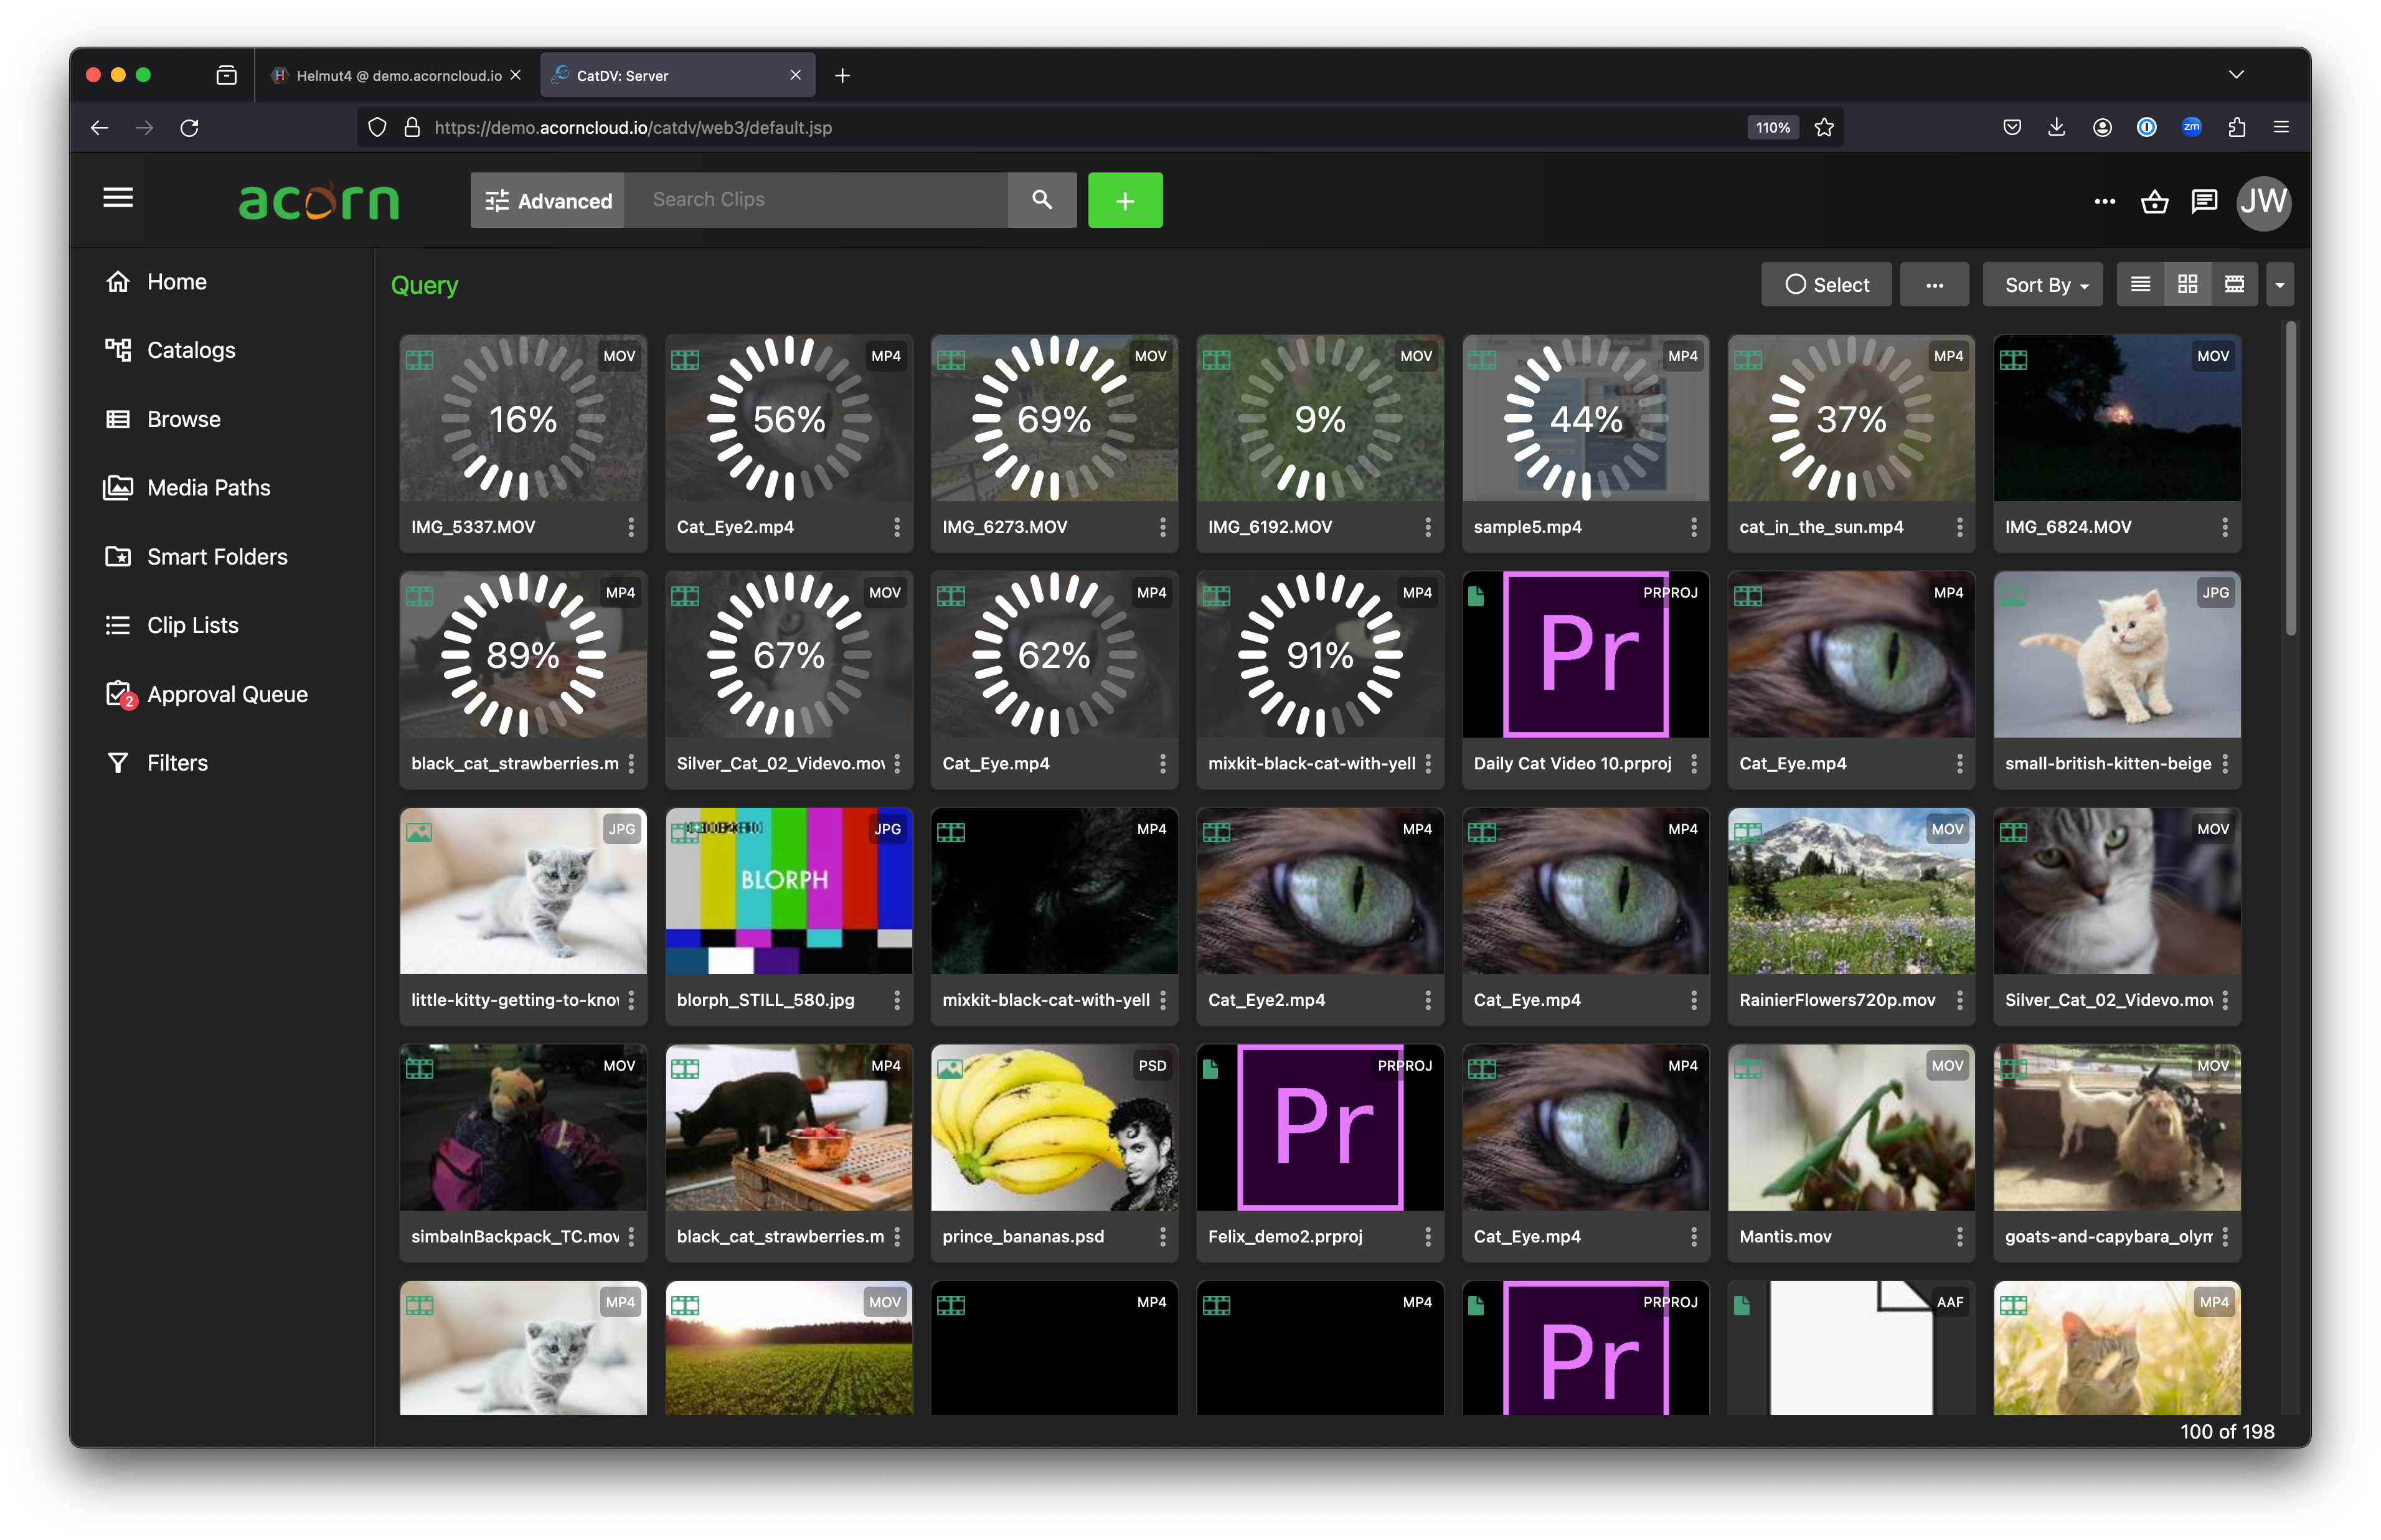
Find the assets you’d like to make edit proxies for (CatDV calls assets “clips”). You can selectively browse or search for them using metadata filters, advanced search, or by browsing to the Catalog where the assets are organized.
Press the
Selectbutton at the top right of the list of clips.You can select assets by clicking them so they’re checked.
You can use Shift-click to select sequential groups of assets.
You can use the
Select Allbutton to select all assets you see. Keep in mind that CatDV will only load 100 assets at a time. If you have more than 100 assets that you’d like to generate edit proxies for, scroll down until the bottom right displays that all of your assets are showing.Once your assets are selected, click the
[...]ellipsis menu and selectEdit ClipsIn the Workflows tab on the right, go to the Edit Proxy field and select
GenerateorPurge.Press the
Savebutton above the metadata panels.
Attaching Proxies Using CatDV Panel

Attaching edit proxies to the hi-res can be accomplished in the CatDV Adobe Panel.
Open the CatDV Adobe Panel extension in Premiere.
Sign into the CatDV Panel.
Click
Attach Proxiesin the toolbar of the panel.The CatDV panel will link the edit proxies to the hi-res media, enabling you to use Premiere’s proxy toggle button under the viewer.
Generating/Purging Proxies Using Helmut4
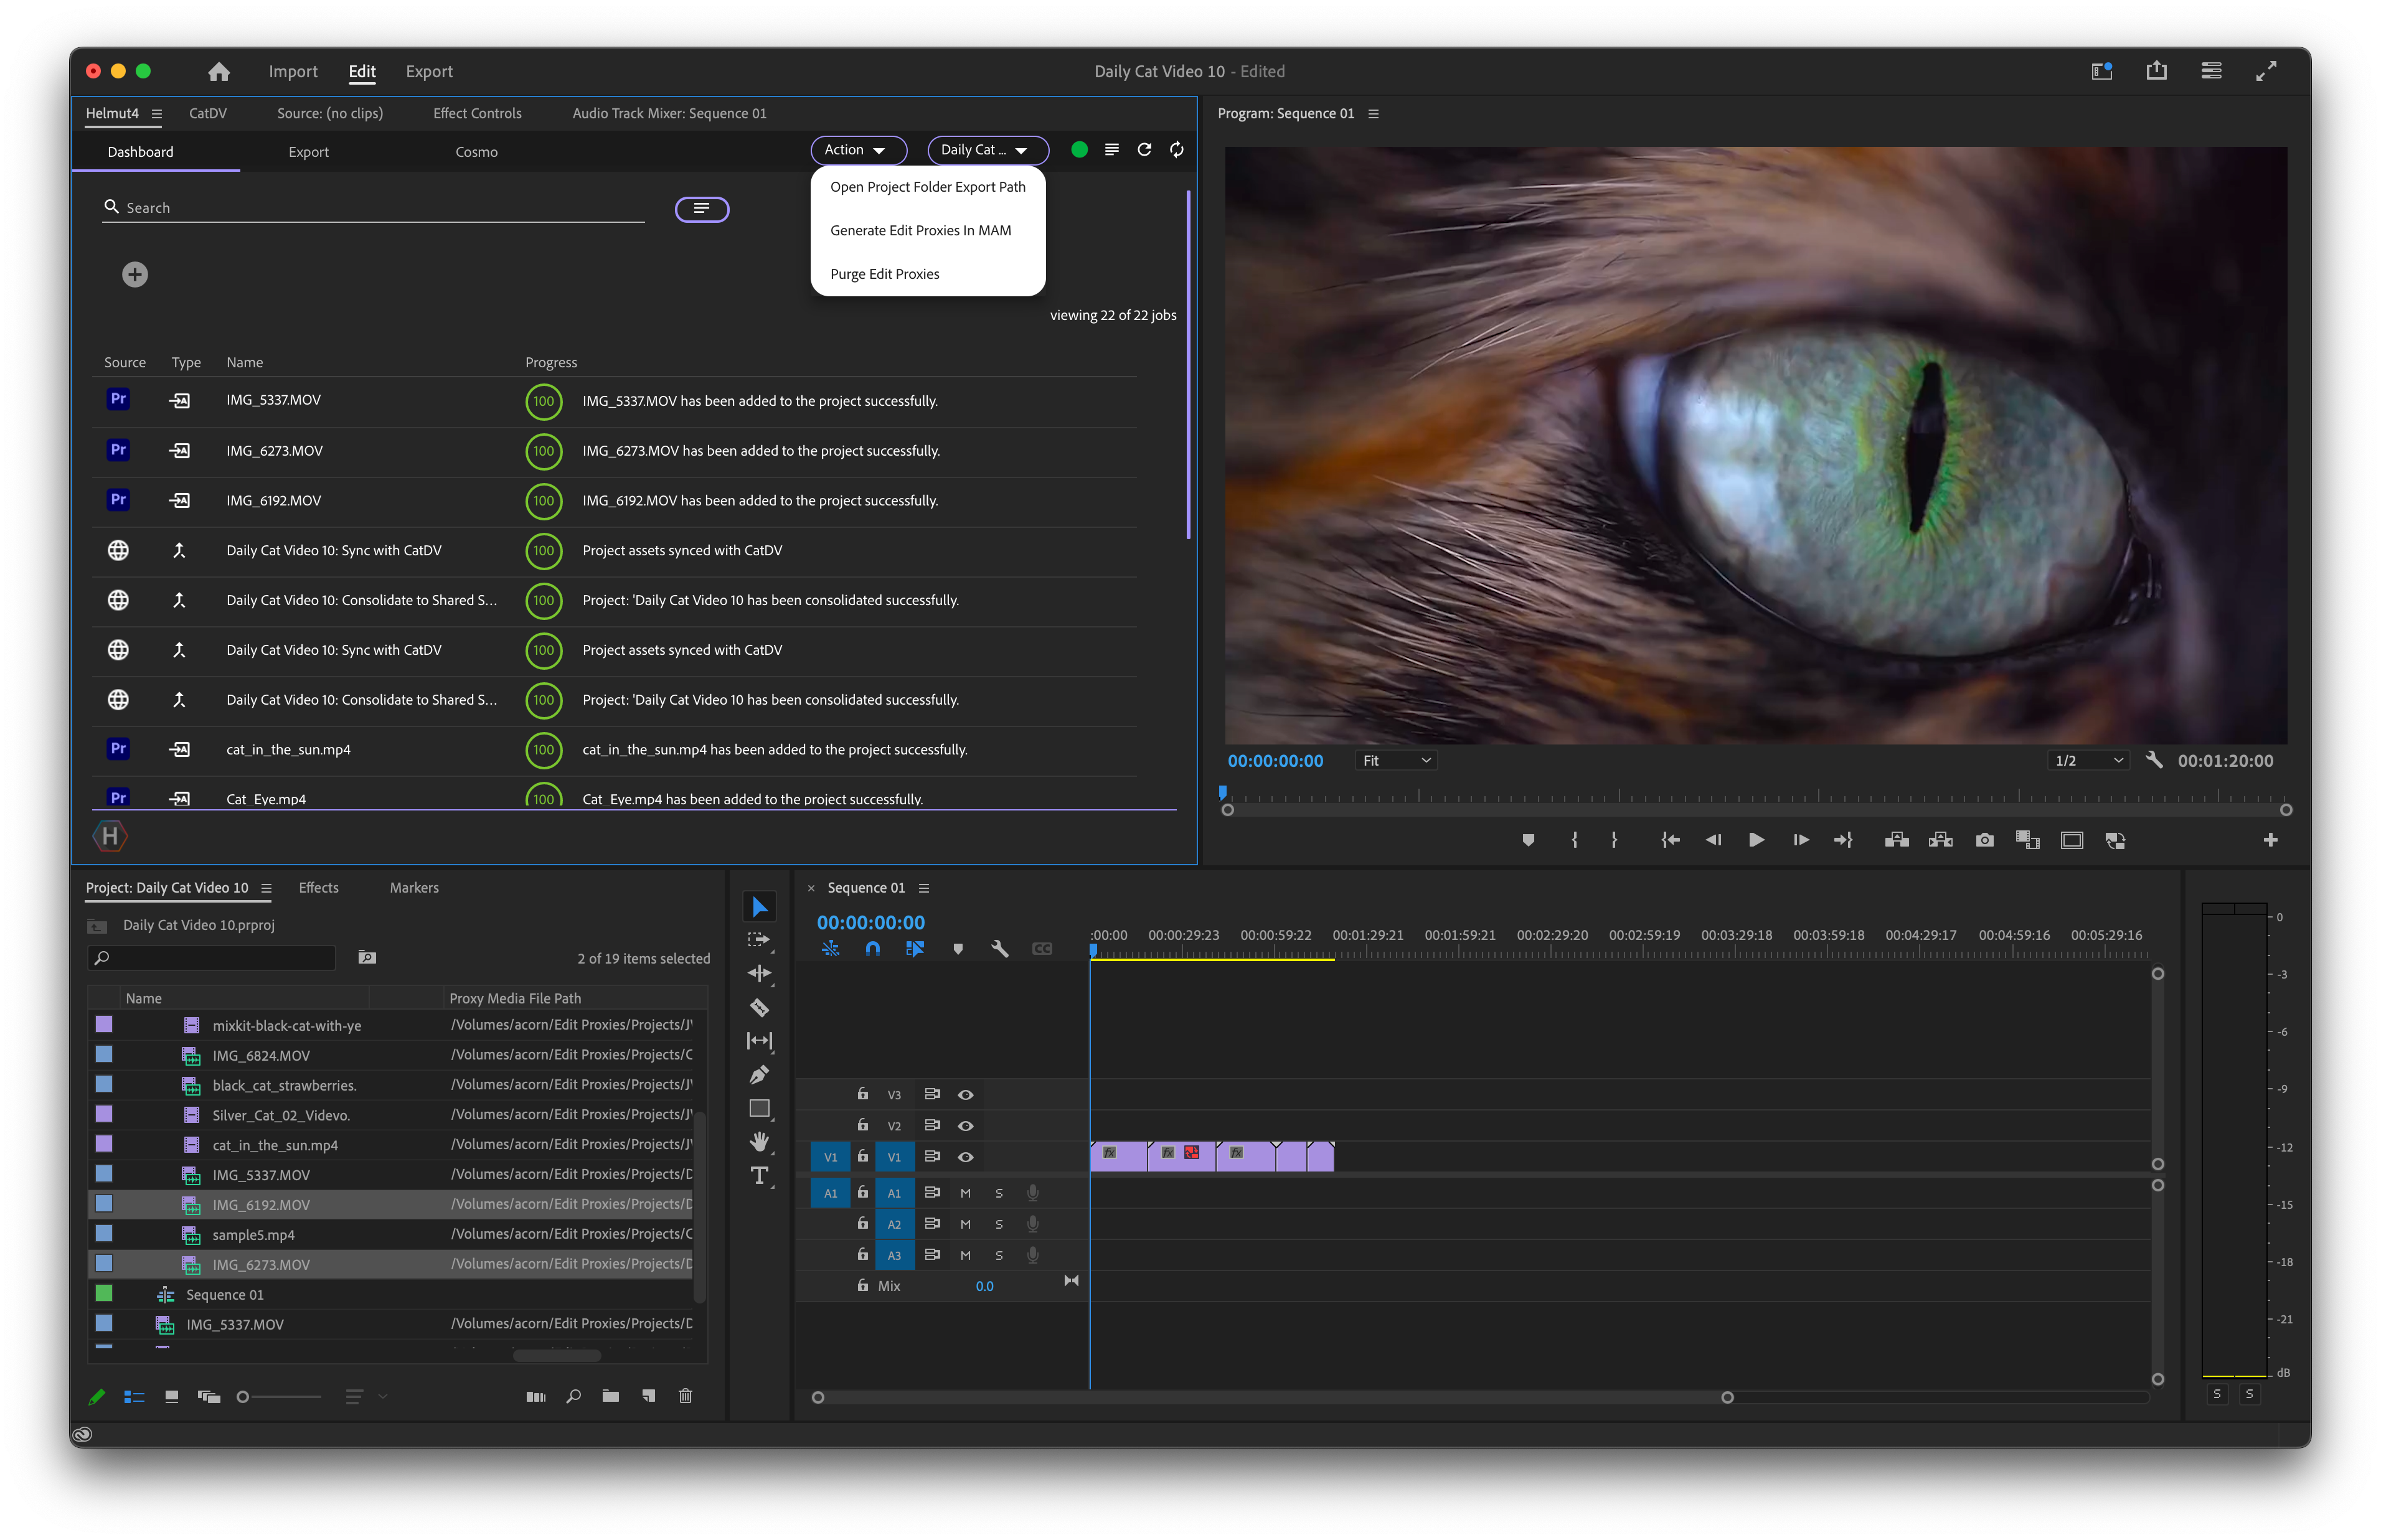
If your project already contains all the media you need to work with, you can use HelmutFX to trigger edit proxy generation in CatDV. Helmut4’s Cosmo module is aware of all the assets in your project and can trigger CatDV to generate them.
Go to the Helmut4 Web UI and open your project by selecting it in HelmutFX.
When the project opens in Premiere, go to the Helmut4 Adobe Panel
From the Action menu, select
Generate Edit Proxies in MAMThe Helmut4 panel will link the edit proxies to the hi-res in Premiere so that you can switch between them using the
Toggle Proxiesbutton under the viewer.It takes time for the MAM to generate proxies. Helmut4 is not generating them, it’s triggering the action in the MAM. You can check the status of the edit proxy generation by looking at the assets in CatDV. They will show progress wheels as the edit proxies generate.
Auto-Purging Edit Proxies
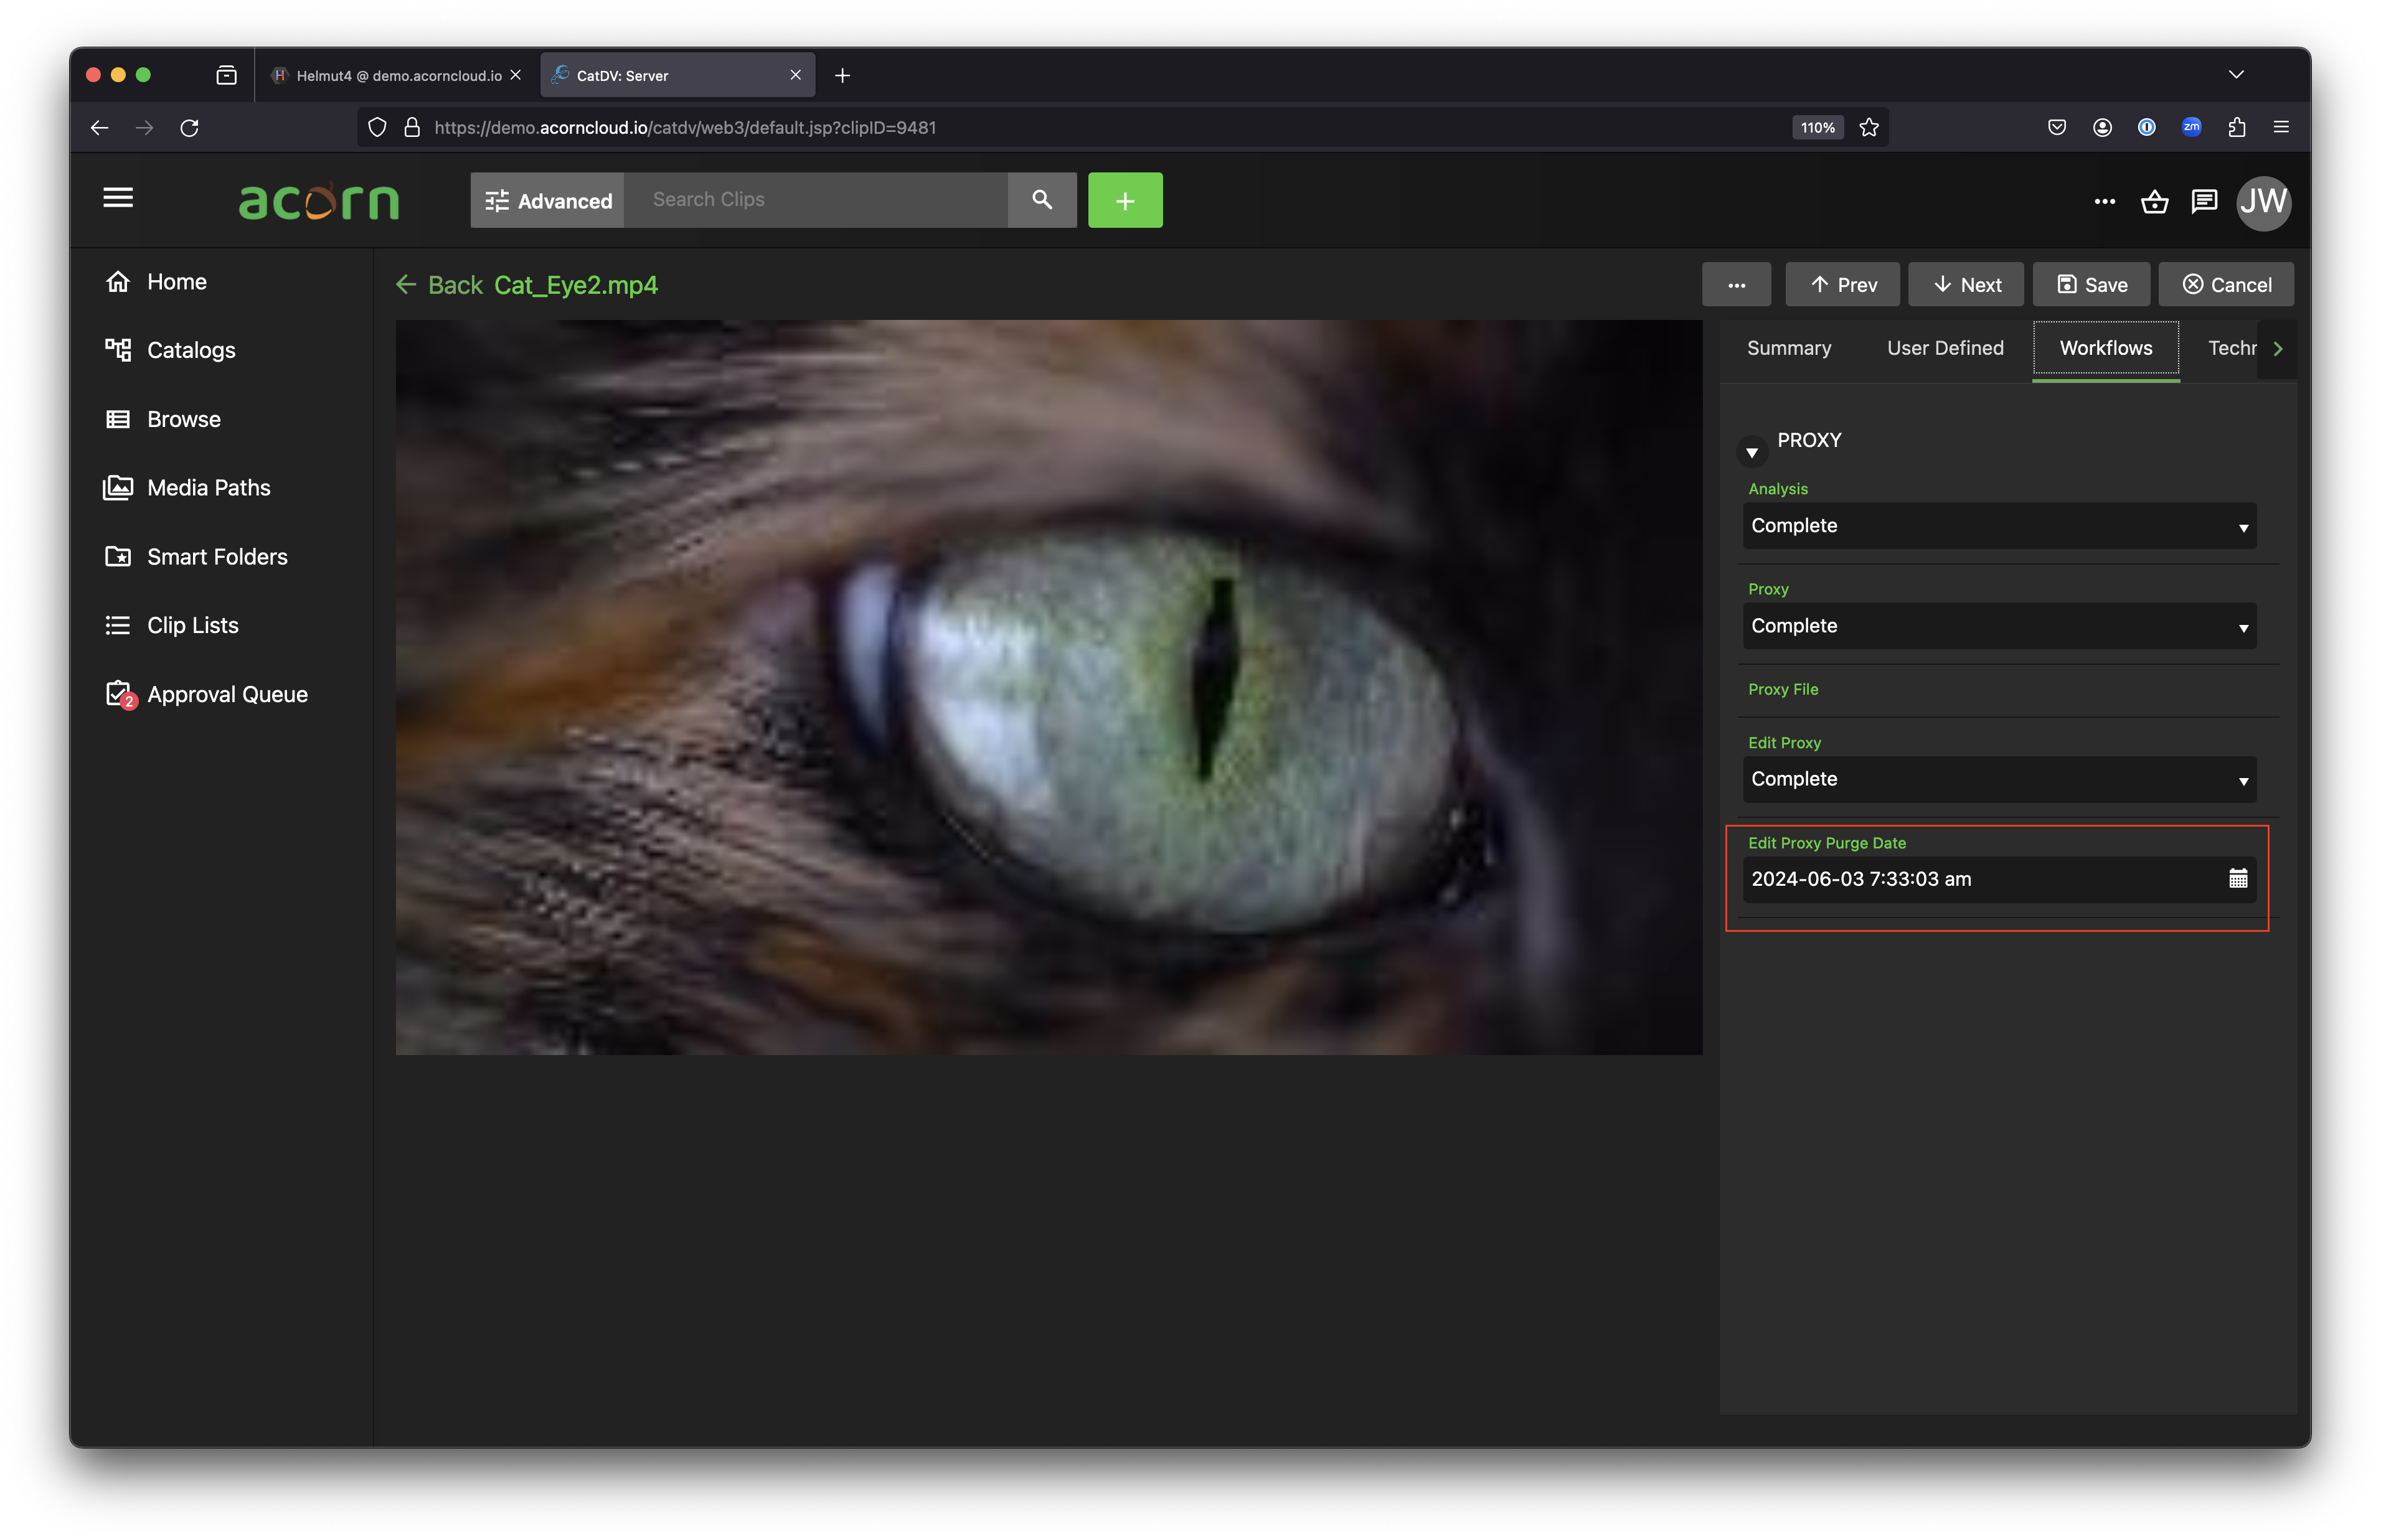
Edit proxies are not needed anymore once your project is finished. CatDV will automatically purge edit proxies on the date indicated in the field Edit Proxy Purge Date. This is set individually for each clip when edit proxies are generated. By default, it is automatically set to 90 days after generation, but it can be adjusted to any date in the future, and that will be the date that the edit proxies will automatically be purged.
The purge date can be modified on individual clips, or multiple clips using a bulk metadata edit as described above.
Exporting Your Sequence
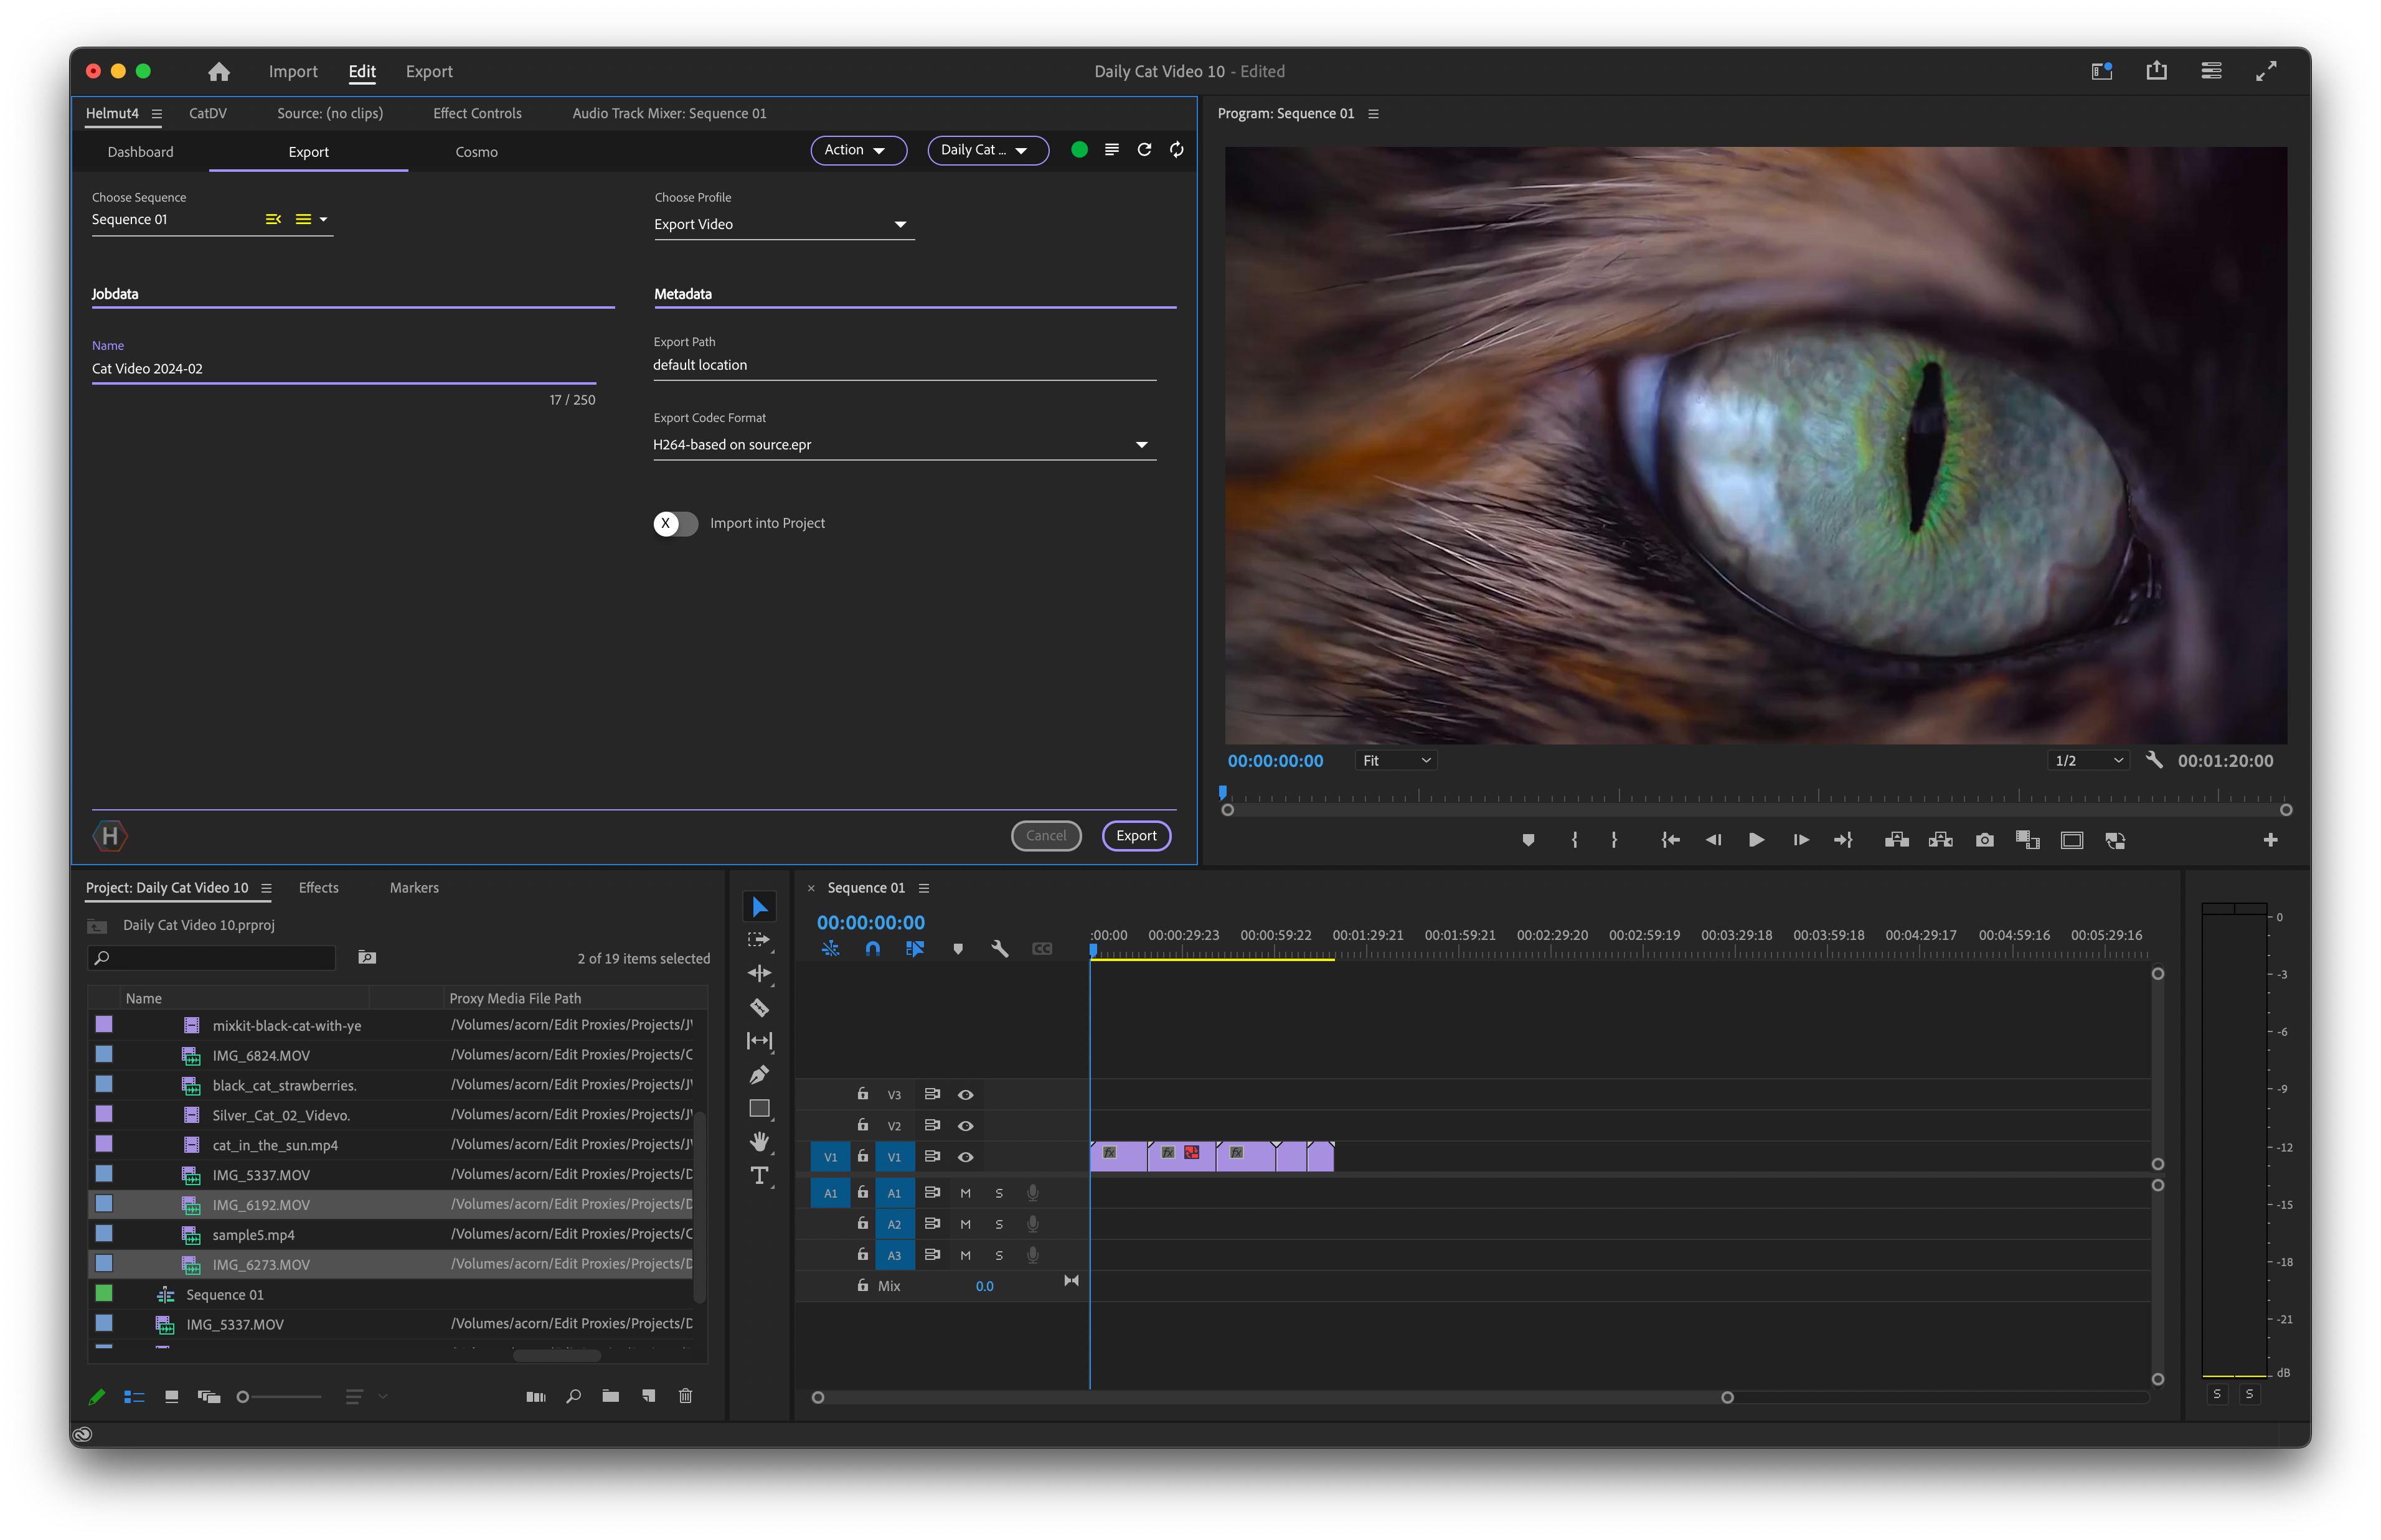
Exporting a sequence using Helmut4’s Adobe Panel is straightforward.
When you use the Export tab in the Helmut4 Adobe Panel, you’ll select an Export Profile from the list of available profiles, and fill in any required Metadata that is relevant to the export action. CHESA will set up Export profiles during your project implementation to your editorial specifications. Export Profiles trigger an automated Stream in Helmut4 that:
Invokes Adobe Media Encoder to encode the Export
Places the exported file in the project folder’s Exports directory
Allows the option to import the exported file back into the project
Other automated actions can be invoked, such as sending the exported file to a review/approve solution, depending on the parameters of your Scope of Work with CHESA
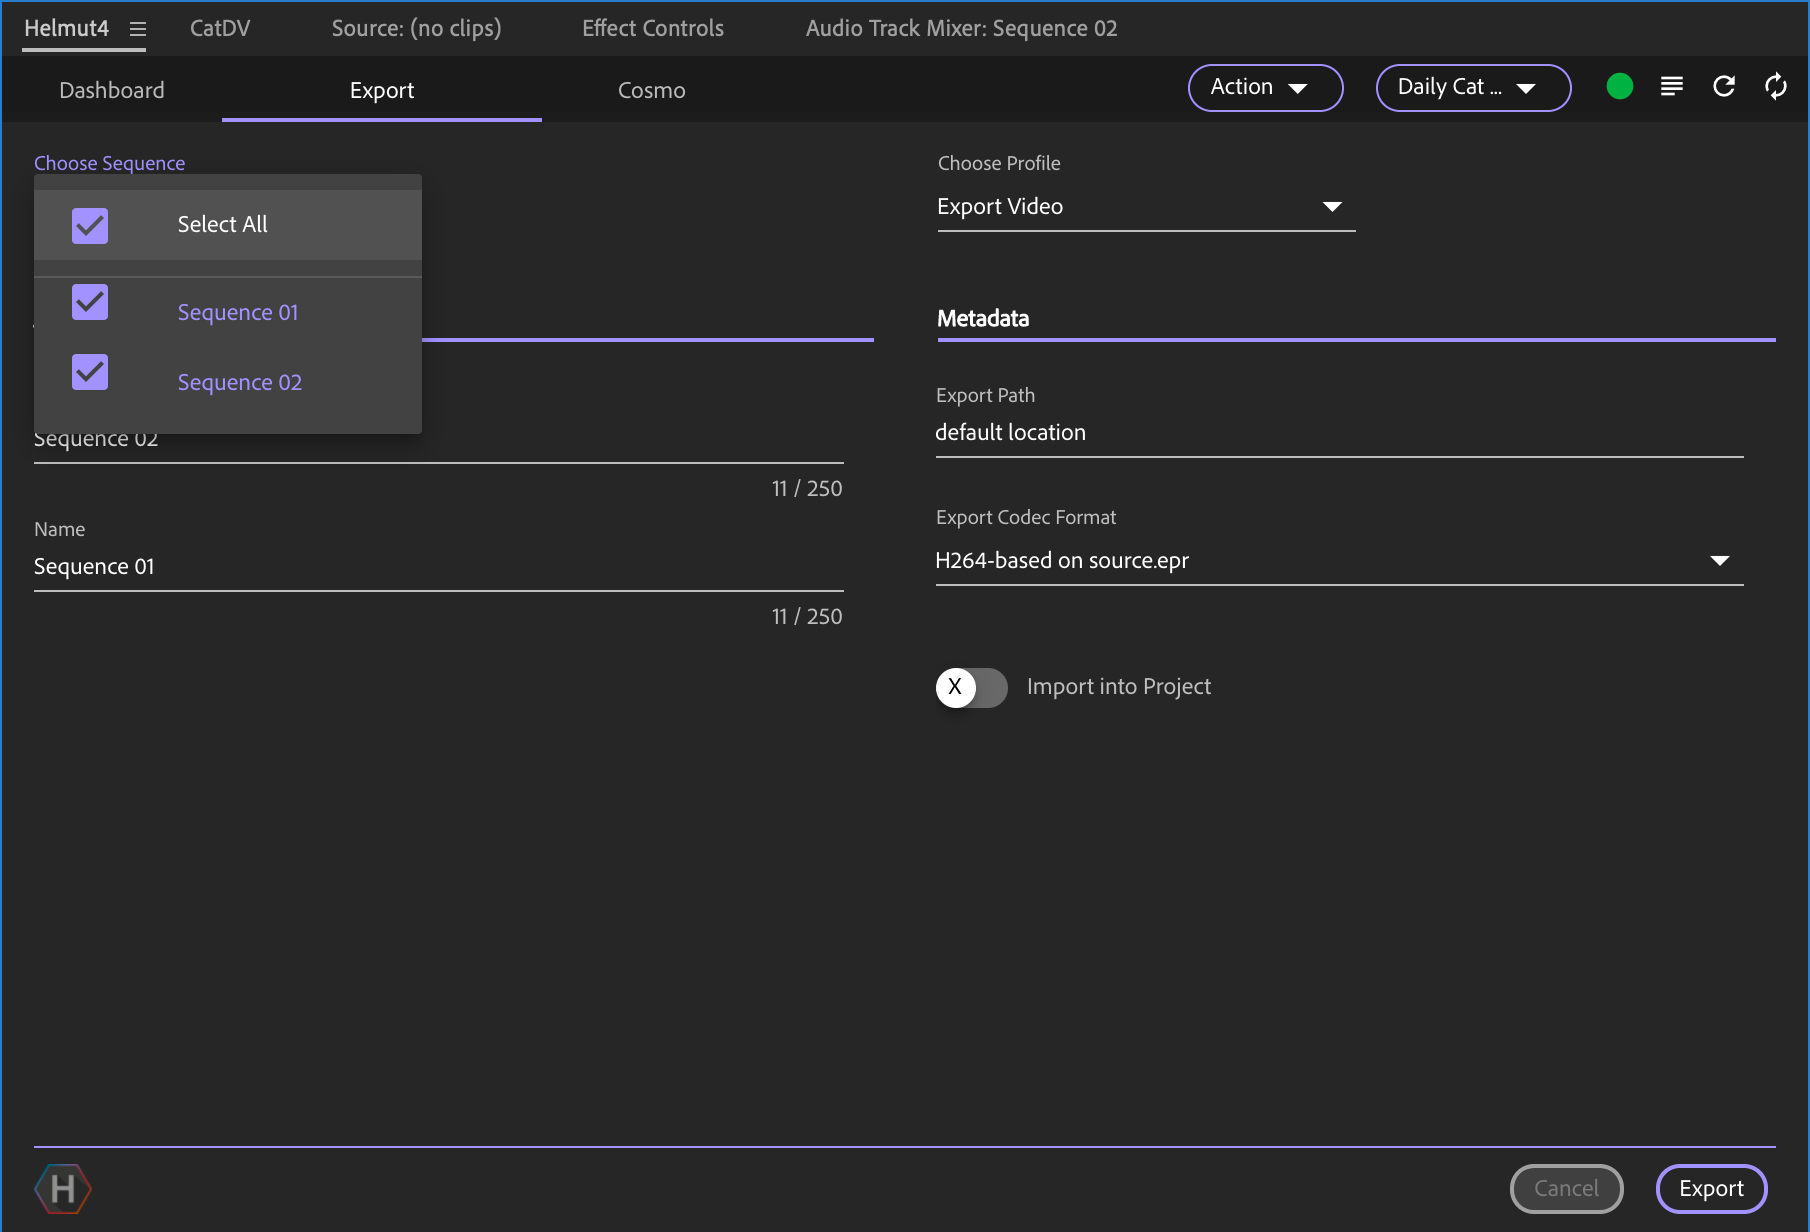
You can also export multiple sequences at once. When you have multiple sequences open in Premiere, the selector on the left side of the Export panel allows you to select multiple sequences to export.
Closing Your Project
When your editorial process is finished for the day, save your project in the Adobe application and close the project. Closing the Project (not saving it) is what invokes the Unlock Stream in Helmut4. The Unlock Stream performs the following actions:
Unlocks the Project in HelmutFX, effectively “checking in” the Project.
Syncs the contents of the project folder with the corresponding Catalog in the MAM (CatDV) so that all media in your project folder is searchable in the MAM.
